Friday, February 9, 2024

A soft goodbye

 Hey folks, it’s me Elizabeth, and I’ve got some bittersweet news to share with you. 


I’ve been a part of Treadle for over 12 years, but now it’s time for me to move on. As of now, I’ll no longer be working in the shop, writing these emails to you, or managing our social media accounts.


I have really loved getting to talk to all of you through our newsletters! Showing you my favorite new stuff, sharing your projects, and of course, bringing you Friday Fun Facts has been delightful!


Teaching sewing has probably been the coolest thing I’ve ever gotten to do in my life. It’s definitely been my favorite part of Treadle. I love helping people be creative, and getting sewists to those “aha!” moments is what makes it all worthwhile.


But don’t miss me too much! I’ll be around as a part-time guest teacher, so you will still have the opportunity to take classes with me! And I might still author the occasional Friday Fun Fact.


You can also see what I’m sewing and making at my instagram! Find me @thatssewmn.


Finally I just want to say a huge thank you to Michele, all the Treadettes, and every one of you reading this right now. It’s been a blast and an honor.


See you around!


Elizabeth


Friday, January 26, 2024

Friday Fun Fact: The math and logic of pleats

Hey folks, it's Elizabeth here, and I'm so excited about this fun fact!

Today we're talking about making pleats. Specifically, the math and logic of pleats.

Let’s begin with basic pleat structure. If you’ve never made pleats before, here’s a quick tutorial.

If you are working from a pattern, you’ll often see a marking of a solid line with an arrow connecting it to a dotted line (top right picture).


To make the pleat, fold and pick up the fabric on the solid line and bring it to meet the dotted line. There’s your basic pleat, or knife pleat.


Sometimes you’ll just baste across the top of the pleat, other times you might edgestitch along the length of the pleat. You can do whatever your pattern suggests.


Often, when I’m working with pleats, I’m not using a pattern. That means I get to figure it out myself! Generally, I am pretty easygoing about pleats. They definitely don’t need to be perfect! If my pleats vary a little, I do not care. But there is a little bit of math we can do to take some of the guesswork out.

In these examples, let’s suppose we’re trying to fit a big piece of fabric - such as the top of a skirt or a ruffle - into a finite, smaller measurement - like the skirt’s waistband, or whatever you’re attaching the ruffle to.

A pleat makes a Z-fold in your fabric, which means that you’re creating three layers out of one. That means your pleated fabric takes up only 1/3 as much space as your original fabric.


If your pleats just touch each other, your starting fabric length should be three times your desired finished length. 3” of fabric will pleat into 1”, or 30” will pleat into 10”, and so on.


That’s the simplest way. But let’s explore some other examples, starting with spaced out pleats.

Check the diagram below with 1" pleats and 1/2" spaces. That places each pleat one half pleat width apart.


We can count up the finished length of three pleats plus three spaces to equal 4 1/2". Then we can count up the total fabric length to get 10 1/2". 

4.5 x 2.333 = 10.5

So, if your pleats are one half pleat width apart (like our example above) cut your fabric 2.333 times your desired finished length. 


If your pleats are one pleat width apart (for example, 1” pleats with a 1” space in between) cut your fabric 2 times your desired finished length. (This example is not pictured.)


Sometimes we want our pleats to be even closer than just touching - we want them to overlap. This is common when pleating a very full skirt.

We generally can’t have pleats overlap by one whole pleat width, because then we’d just get a giant stack of pleats that went nowhere but up! So let’s move on.

For pleats that overlap by half the pleat width, cut your fabric 4.333 times the finished width you need. (I didn't draw this one, so you'll just have to trust me.)

For other kinds of spacing, you can sketch it out on paper and experiment! Spoiler alert: that’s all I have done to figure these out.

It’s crucial to remember that the size of the pleat DOES NOT MATTER for these formulas. A 1” wide pleat triples the fabric, and so does a ½” wide pleat. We’re using a 1” example just to make it simple.

Okay, now that we’ve done all that math, it’s important to remember that fabric and human hands are not mathematically perfect. Fabric moves and stretches and wiggles, and there is a limit to the accuracy of human hands. 

So if you do all this work and your pleats are still not perfect, don’t despair! Here are a few more tips:

- With most fabrics, your pleats will have a tendency to “grow” or spread out, so I always make mine spaced slightly closer than I need.

- It’s easy to go back and adjust one or two pleats to get the fabric to the desired length, and it generally won’t be visible in the finished garment.

- Box pleats are two knife pleats facing each other, so when doing the math for box pleats, you just count it as two pleats.

Another great resource for this kind of thing is the book The Art of Manipulating Fabric by Colette Wolff.

Check out all our Friday Fun Facts in the archive here!

Tuesday, January 23, 2024

Treadle Make Tuesday: Michele's Toaster Sweater

Every Tuesday we share projects from Treadle Yard Goods employees (a.k.a. The Treadlettes) and our customers and fans!


Michele made this cute Toaster Sweater from graphic print French Terry knit.

The Toaster Sweater is our pattern of the month - it's 15% off through January!

reg $ 24.95   Sale $ 21.20 

Tuesday, January 16, 2024

Treadle Make Tuesday: Mary's Embroidery in progress

Every Tuesday we share projects from Treadle Yard Goods employees (a.k.a. The Treadlettes) and our customers and fans!

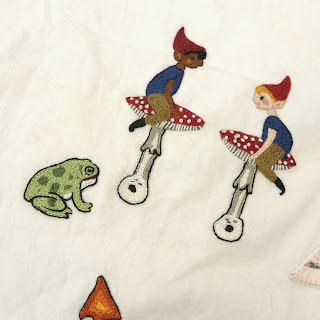
Mary Klemp brought in this beautiful project in progress to share with us!

She's hand embroidering this massive piece with gnomes, mushrooms, and mythical creatures. We were all stunned when she unrolled this in the store.


Friday, January 12, 2024

Friday Fun Fact: process vs. product


Hi folks, it's me Elizabeth here, and today's Friday Fun Fact is more of a Friday Fun Opinion. Come along, let chat.

A topic we’ve been discussing lately in class is process vs. product. Are you a process creator or a product creator? Let me explain.

At one end of the spectrum is the process creator. A process creator sews (or knits, or paints, or chops logs, or whatever) purely for the enjoyment of doing it. The process of creating is itself enough to keep them engaged. The satisfaction of the doing is its own reward. 

Process creators might still enjoy some tasks more or less than others, but overall, the point of the creating is just in the doing. 


At the other end of the spectrum is a project creator. Project creators could not give a darn about the experience. They want the end result!  Why bother making something if you don’t care about the finished item? 

A project creator might enjoy making, but overall, the making is not the point. The point is getting the thing.

Now most of us aren’t going to fall all the way to either side of this scale. We might rate ourselves as 20% process and 80% product, or the other way around, or a straight 50/50.

Here’s why this matters: understanding your motivations for sewing will inform the decisions you make as a creator. 

A person who leans more toward the process side of sewing might choose a technique based on how much they enjoy it. Do they enjoy the challenge of welt pockets? Or maybe they love sewing lots of long, straight lines. The choice is based on the feeling of the doing.

Someone who’s more on the project side would probably choose the technique that gave them the result they wanted most, regardless of how the experience of sewing it felt. If they wanted a welt pocket, they would make a welt pocket. If the seam finish just has to be serviceable, they probably won’t bother with a fancy one.

Plus, where you land on this scale might change with every different thing that you sew!

In our sewing, we are faced with decisions all the time. Even the strictest direction-follower still has to make choices. Understanding where your motivation lies can help you figure out which choice to make and which path to take. And that will help us all enjoy the process - and the product - even more.

Tuesday, January 9, 2024

Treadle Make Tuesday: Laura's Samson top

Every Tuesday we share projects from Treadle Yard Goods employees (a.k.a. The Treadlettes) and our customers and fans!

Laura made this cute pullover top from the Seamwork Samson pattern and plaid cotton flannel. This easy pattern is one of our Beginning Sewing class project options.


Friday, January 5, 2024

Friday Fun Fact: the fabric swirl

We're back! And today we're talking about the fabric swirl.

You’ve probably noticed the way I like to swirl the fabrics when I take photos for our shop and emails. It looks pretty to show the fabrics this way, but there are other, more practical reasons why I do this!

The first reason is drape. A crisp fabric will stand up by itself, while a soft, draping fabric will fall in softer folds.

Compare the crisp pink linen fabric above to the drapey green fabric below. Notice how the linen holds itself up, while the green fabric puddles.

The next reason is to give you a better idea of what the fabric will look like when you're wearing it. Fabric never hangs perfectly flat on the body, so a flat photo doesn't help much.

Twisting, swirling, or creating folds changes the way the fabric reflects light, so you can see what it would look like draped over a body, like the velvet below.


Of course, sometimes the swirl can obscure a printed pattern or design. That’s why with prints we always make sure to include alternate views on each product page: swirled and flat, so you know exactly what you’re getting.  

Tuesday, January 2, 2024

Treadle Make Tuesday: Rachael's quilted stocking

Every Tuesday we share projects from Treadle Yard Goods employees (a.k.a. The Treadlettes) and our customers and fans!

Treadle student Rachael made this beautiful Christmas stocking with batik patchwork and free-motion quilting. A perfect addition to a handmade holiday!